Lets learn pixel shaders - Chap 2 - Basics
Important - To move forward open another tab in your browser and open the URL http://www.iquilezles.org/apps/shadertoy/, I will refer to this tab simply as 'Shader Toy'
Chapter 2 - Basics of pixel shader with 'Shader toy'
Let us write some code, switch to the shader toy and notice that the "Deform" shader is already loaded and is running by default. On the right side bottom you see the source code, and on the left is the rendered effect. Take some time to notice the various details/controls shown to you like
1) fps, time, play/pause button, restart button on top of render area (place where the effect is played).
2) Dimensions panel - Width and height of the render area on top it. You can change it if you want.
3) The textures passed to the pixel shader are given right to the width/height box. You can pass up to 4 textures and use them in the pixel shader. The texture used in deform shader is given in the box 'unit 0'. Copy paste that URL path in a new tab and check the texture for yourself, or you can just click this link.
4) Also you can check the other shaders by going through presets drop down list. Don't forget to click 'Load'. There are some cool effects which you have no idea how to create, but at the end of this series you will learn to make most of them.
5) Most important thing we need to notice is the compile button. It is given above the source code area along with 'help' button.
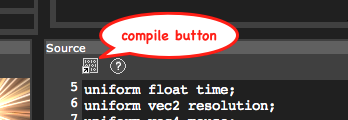 n00b note - Every time we write new code, we need to press the compile button to see new source code taking effect.
6) Now let us write some code. We will begin with a blank program. Copy paste the following code in the code window.
--- Now hit the compile button and see the output on the left side ---
7) Beautiful isn't it !
It will be a blank screen. Basically for now we have not written any code. Being a programmer I'm sure you can notice that main function is empty. If you don't know what main() function is, then stop reading right away, don't waste your time. Grab a good C or C++ book or tutorial.
8) Now let us write our first line. If you recap I said - "pixel shaders are programs that are run for every pixel on the screen and they can do one thing, set the pixel color". So let us do that now. Inside the void main function block write the following line
Now how do we make things interesting? Wait for next chapter :)
Chapter 2 - Basics of pixel shader with 'Shader toy'
Let us write some code, switch to the shader toy and notice that the "Deform" shader is already loaded and is running by default. On the right side bottom you see the source code, and on the left is the rendered effect. Take some time to notice the various details/controls shown to you like
1) fps, time, play/pause button, restart button on top of render area (place where the effect is played).
2) Dimensions panel - Width and height of the render area on top it. You can change it if you want.
3) The textures passed to the pixel shader are given right to the width/height box. You can pass up to 4 textures and use them in the pixel shader. The texture used in deform shader is given in the box 'unit 0'. Copy paste that URL path in a new tab and check the texture for yourself, or you can just click this link.
4) Also you can check the other shaders by going through presets drop down list. Don't forget to click 'Load'. There are some cool effects which you have no idea how to create, but at the end of this series you will learn to make most of them.
5) Most important thing we need to notice is the compile button. It is given above the source code area along with 'help' button.

6) Now let us write some code. We will begin with a blank program. Copy paste the following code in the code window.
#ifdef GL_ES
precision highp float;
#endif
uniform float time;
uniform vec2 resolution;
uniform vec4 mouse;
uniform sampler2D tex0;
uniform sampler2D tex1;
void main(void)
{
}
--- Now hit the compile button and see the output on the left side ---
7) Beautiful isn't it !
It will be a blank screen. Basically for now we have not written any code. Being a programmer I'm sure you can notice that main function is empty. If you don't know what main() function is, then stop reading right away, don't waste your time. Grab a good C or C++ book or tutorial.
8) Now let us write our first line. If you recap I said - "pixel shaders are programs that are run for every pixel on the screen and they can do one thing, set the pixel color". So let us do that now. Inside the void main function block write the following line
gl_FragColor = vec4(0.0, 0.0, 0.0, 1.0);gl_FragColor is a built-in variable through which we can write the pixel color. vec4 is a custom data type just like int, float, bool etc. But vec4 is a vector of 4 float numbers. The numbers are the colors - R, G, B and A. So here we say R, G, B are zero and Alpha is one which works out to black color. Hit compile button and make sure it is not paused on the left side, you will see the screen turning black. Now try replacing that line with the following.
gl_FragColor = vec4(1.0, 1.0, 1.0, 1.0);Click compile and run again, you get the idea? As the same program is running for each pixel on the rendering area, and what we are doing is just setting it to white, the whole screen looks white.
Now how do we make things interesting? Wait for next chapter :)

Comments
Post a Comment